Chuck Steak with Potatoes, Arugula, and Chili Oil

Since creating Shady Morels, my approach was always to spare you my personal life story as much as possible, and focus on what really matters — the food.

Now is no time to deviate, so I won’t go into details regarding the lengthy period of time spanning my last post to this one. I will say that my passion for creating food has only increased exponentially; I create something new almost every day, and I’m excited to share some of this with you.

Going forward, you’ll be seeing photos taken with a new lens (Canon EF-S 60mm f/2.8 Macro), which results in a 96mm equivalent when using our Canon EOS camera.

I’m also going to significantly pare down the recipe instructions. If you’re anything like me, you’re probably viewing this to gain inspiration for dinner, but not necessarily to follow verbatim. I’ll give you the basic ingredients, maybe explain why certain things work together, and briefly go over the preparation concept.

Without further adieu, here is the food.

Ingredients:

For the braised chuck steak:

Some great quality chuck steak, like 63 Acres

Quartered onion, and peeled whole garlic

White wine

For the garnish:

Small potatoes, I used siegliende

Arugula

Garlic, along with some herbs like thyme, oregano, or rosemary

Smokey chili oil, which is simply muddled fresh red chili, garlic, salt, and pimenton

Vibrant green oil for plating

Method: 

Chuck steak is seasoned with salt and pepper, seared, then braised (covered) at 315 degrees Fahrenheit with the onion and garlic for a minimum of two hours. During the last 15 minutes, I take off the lid and broil on high to develop a nice crust.

Potatoes are parboiled, then “smashed” and sautéed. Finished with herbs and garlic, and tossed with arugula off the heat.

For plating:

I arranged the potatoes and arugula in a pile in the center of the plate, dappled on some of the smokey chili oil, then topped with the braised chuck roast. As a finishing touch, I did a swirl of vibrant green oil followed by the chili oil to achieve a nice visual contrast.

Why this works: 

It’s ramped up meat and potatoes, with some brightness derived from the arugula and vibrant green oil, and contrasted by the smokey chili oil. The chili and arugula is a particularly good pairing in my opinion.

I prefer beef braised with just onion, garlic, and white wine or chicken stock – rather than the typical mirepoix and red wine approach. I find the result is more true to the flavour of the beef, and lends itself well to more interesting derivations from the braised beef. More on this later!

Enjoy with a nice bottle of red, this one was enjoyed with a 2016 Francis Ford Coppola Cabernet Sauvignon.


Camping Post: Chicken with Red Wine Sauce

I’m currently on the north coast of Barkley Sound. Three days ago I was on the South coast in Bamfield. My life over the last week has involved mainly surfing and fishing for halibut and salmon. I’ve scored on both accounts. Fishing was the best I’ve ever experienced, and a beautiful southwest swell has been dishing up consistent fun sized surf for the Tofino coastlines over the past three days. Today alone I logged about nine hours in the water. Since living in Vancouver, I’m like a crack addict when I get to surf, I never know when my next session will be so I make it count! Needless to say, life is good, but I’m exhausted!

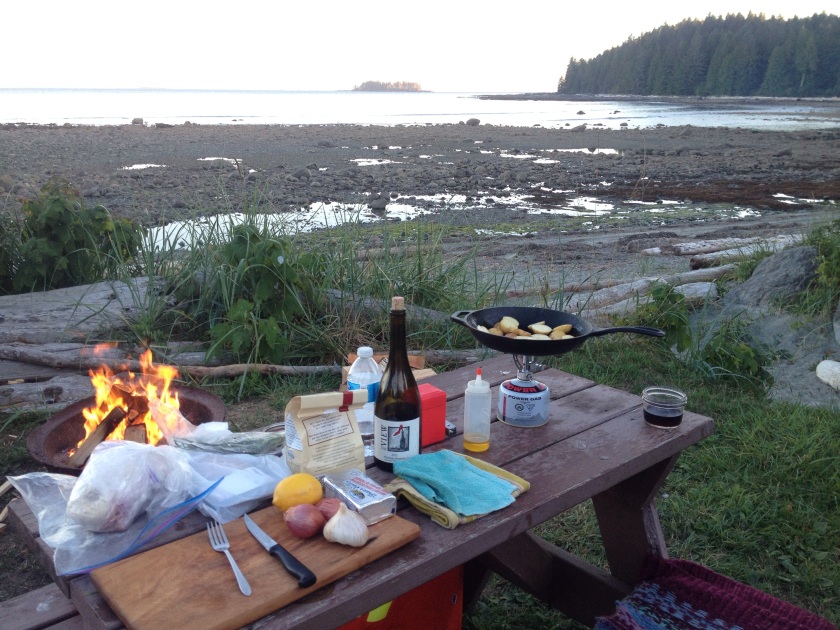
Tonight I decided to document some of the food I’ve been making back at my little basecamp at Mussell Beach. Logging so much time surfing, I wanted something nourishing and  satisfying due to the energy I’ve been expending. I decided on chicken with red wine sauce; simple, and easily accomplished with limited camping supplies. The results were delicious.

You can make this on a stove or on some coals. Although I’d love to, I didn’t have time to establish a good fire for coals, so I just used my backpacking stove and cast iron pan.

Note, the measurements and techniques in this recipe are very approximate, as they should be since I’m currently camping!

The setup, not a bad vantage point to make a delicious meal.

Ingredients:

1 chicken breast

1 shallot, julienned

1 clove garlic

A half glass of red wine

A good knob of butter

A few new potatoes, sliced

1 sprig each of rosemary and tarragon, add some chives too if they’re handy

A few glugs of olive oil

Salt and pepper to taste

Directions: 

1. Get your cast iron pan on medium-ish heat, then add some olive oil and the potatoes and sauté for ten minutes. Toss in some of the garlic and the rosemary, then season. Sauté for another 5 minutes or so, then transfer to a pot with a lid to hold and let them keep cooking for a while under their own heat.

2. Season the chicken with salt and pepper. Get the cast iron hot again, then place the chicken in the pan and monitor closely. It took me about 25 minutes of constant babysitting to get a good cook throughout without burning the chicken. Transfer to the pot with the potatoes to hold.

3. Get the cast iron pan to medium-high heat, then toss in the shallots and remaining garlic for 30 seconds. Add the red wine and let deglaze and reduce for a couple minutes, then add the butter and swirl the pan around to incorporate. Remove the pan from heat.

4. Add the potatoes and chicken back to the pan and add the tarragon and chives. Season again if needed, then eat directly out of the pan like this:

Enjoy!

Romesco Sauce

You can put this stuff on anything! There are a tonne of variations; for this one I just took one of the simplest recipes I could find and added roasted tomato and dried chilis.

I made a big batch last week, and it was gone within a few days. I put it on chicken, grilled veggies, in a grilled cheese, mixed it into a vinaigrette, and then I ran out of sauce, so even I do not know the full extent of its capability!

This sauce is even vegan, gluten free, and paleo. So it’s a great sauce to make if you have dietary restrictions.

For a quicker version, use canned roasted red peppers and fresh garlic. Omit the tomatoes.

Ingredients:

1.5 pounds fresh red bell peppers

2-3 ripe plum tomatoes

6 cloves of garlic

1.5 cups of fresh almonds

0.5 cup of good olive oil

2 Tbsp red wine vinegar, or sherry vinegar if you have it

1 Tbsp dried red chilis

1 Tbsp smoked paprika

Salt and pepper

Directions:

1. Preheat oven to 450 degrees f. Place  red peppers in a deep sided baking dish and roast for 15 minutes, flipping after about 10 minutes. Add the tomatoes and garlic, then roast for another 10 minutes. You want a nice char on the peppers, so don’t worry about burning it since they will be peeled.

2. Place the roasted peppers in a plastic bag and seal, set aside the tomatoes and garlic. This will steam the peppers and make them easier to peel.  After about 10 minutes they will be cool enough to peel. Discard the skins, stems, and peels.

3. While the peppers are cooling, lightly toast the almonds in a sauté pan. Don’t burn them.

4. Toss all the ingredients in a food processor and pulse to a consistent paste. Don’t over do it, you still want some texture in the sauce.

Enjoy!

IMG_2992

Crostini of Fava Bean and Pea Puree with Sauteed Morel Mushrooms

This dish is meant to show off the morel mushroom in all it’s earthy glory. The fava bean and pea puree is exceptional on its own, but forms a fresh, spring inspired bright green canvas for the morel mushroom to unleash its complex umami flavour and unique texture. For me, this dish performs the perfect marriage of the quintessential spring vegetables. It’s food you savour with every bite, and you wonder how a simple combination of things could ever be so mind blowing. If you’re going to make anything from this blog, make this. Serve it as an appetizer, and people will lose their minds!

If you’ve never had the pleasure of eating a fresh morel mushroom before, I implore you to seek some out at a local farmer’s market and make this dish. You will have to go now because the season is extremely short, from mid May to early June in the Pacific Northwest. Fava beans can also be found at the same time, usually at green grocers from May to mid summer.

One day, I will write about a successful mushroom forage, where the bounty is consumed on the spot with a camping stove and a select combination of ingredients. This is the dream, but to date I have been completely unsuccessful in my morel foraging escapades. In the meantime, I will venture further and further into the woods in the pursuit of my namesake. They are elusive little buggers, but I will find them one day!

Fava beans, peas. garlic, morels, and mint

Ingredients:

For the fava bean puree:

1 lb fresh fava beans (aka broad beans) in their shell, about 12 total

1/2 cup shelled peas

2 cloves of garlic, roughly chopped

3 sprigs of mint

Zest and juice of one lemon

1/2 cup shaved Pecorino Romano

1/2 cup high quality olive oil

Salt and pepper to taste

Directions:

To shell the fava beans is a two part process; it’s intimidating at first, but you’ll be flying through it in no time:

First, take the stem portion of the bean and pull back like you’re peeling a banana. A thin string should peel down the seam of the bean, allowing you to pull apart the sides more easily. Shell as you would a pea, and reserve the beans for part two.

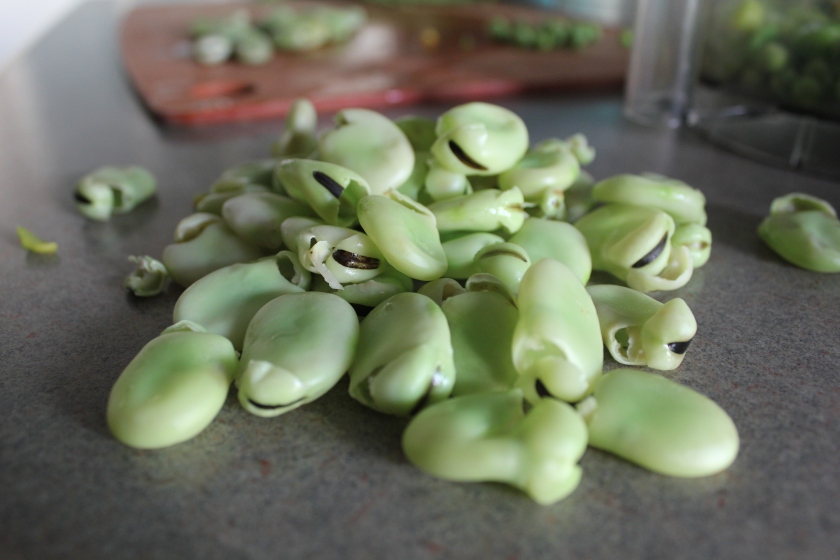
Second, set a small pot of water to boil. Toss the shelled beans in the boiling water for 30 seconds. Remove with a slotted spoon and toss into an ice bath, or rinse with cold water to stop the cooking. To peel the individual beans, hold the fava bean like a guitar pick, with the black line at the end of the bean facing outwards. With your other hand, make an incision right above the black line with your finger nail, and peel down the end. Now squeeze with the fingers holding the bean, and it will pop out into two firm pieces.

Disclaimer: they have a tendency to fly across the room when you are popping them out of the inner shell, but your aim will improve (maybe).

A typical scene when making fava beans

To make the puree:

1. Place all the ingredients with the exception of the olive oil and the Pecorino Romano into a food processor. Pulse on and off, until all the ingredients are roughly chopped.

All of the ingredients prior to blitzing

2. Add the Pecorino Romano, and half of the olive oil, and pulse again a few times to combine. Do not puree to an indistinguishable mush, you want all the character and texture of each layer to come through.

3. Transfer to a bowl, and add the remaining olive oil, stir to combine. The result should look like this:

Proper consistency of the puree

For the sauteed morels:

8-10 fresh black morels, or whatever variety you have access to

1 tbsp olive oil

1 clove of garlic, peeled

1 tbsp butter

Salt and pepper to taste

Directions:

1. Heat a cast iron pan to high heat, add morels to the pan and allow to cook dry for 5 minutes. Don’t overcrowd the pan, you want high dry heat to really bring out the mushroom flavour and aroma.

This is what it means to not overcrowd the pan

2. Add the olive oil, then toss the morels around a bit for about 30 seconds. Add the butter and garlic, and continue to move the morels around. Continue to saute for 2 minutes, then season and remove from heat.

To make the crostini: 

Take a few slices of baguette or french bread, and lightly toast with some olive oil in the morel pan. Rub with a garlic clove sliced in half to finish.

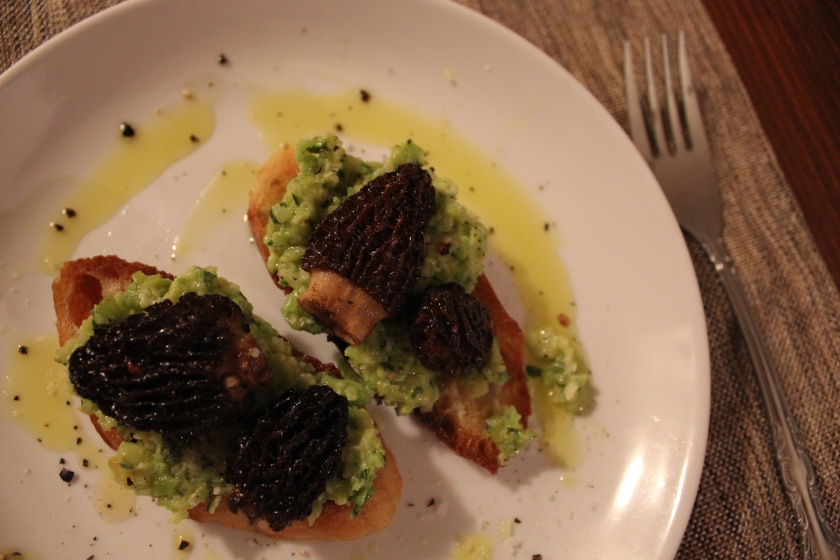
To plate, spread a dollop of the fava bean puree over the crostini, then top with a few of the sauteed morels. Drizzle over some olive oil, and finish with some freshly cracked pepper and sea salt.

Enjoy!

The plated dish, perfection in my opinion!

iPhoto 2

Rib Eye Steak with Porcini Sherry Sauce and Blue Cheese

This is my formula for steak, and I almost never deviate from it:

Seasoning: Nothing more than a liberal amount of salt and pepper

Cook: Sear and baste with butter, thyme, garlic. Finish in the oven. Rest.

Sauce: Pan reduction sauce with wine or spirits, finished with butter.

Simple right? A great steak should be simple; treat it with care and respect, and let the quality ingredient do the work. When I was learning to cook steak, the sauces would end up over complicated and confusing. What I do now is way more simple and less time consuming, but the results are infinitely superior. It’s funny how a decade of experimenting in the kitchen leads to the pursuit of simplicity.

This recipe is only a slight deviation from the general formula, since re-hydrated mushrooms are incorporated into the sauce in the last step. Some exceptional, crumbly blue cheese is the perfect contrast to the richness of the beef and sauce.

You could also barbecue, but why miss out on the opportunity for a great pan sauce? Save that for the hanger and flat iron steaks.

Please opt for a smaller, but higher quality steak instead of the biggest behemoth you can find. You will end up with a better sear, more flavour, and a far superior presentation.

Ingredients:

For the steak:

1 best quality rib-eye steak you can afford

Generous amount of kosher salt and coarsely cracked black pepper

1 tbsp grapeseed or light olive oil

1 garlic clove, smashed

1 tbsp butter

Couple sprigs of fresh thyme

For the sauce:

1/4 cup dried porcini mushrooms

1/2 cup boiling hot water

1 oz dry sherry

1 tbsp butter

Small chunk of good quality blue cheese

Directions:

1. Re-hydrate the mushrooms with hot water in a bowl and set aside. Do not drain or discard the mushrooms.

2. Meanwhile, generously season the steak. Preheat the oven to 300 degrees F. Get a cast iron pan piping hot, add the oil, then carefully sear the steak on one side. Do not disrupt it, this is important! You can take a peak after about two minutes by using a fork to pull up one corner. If you see a rich amber brown all over the full surface, not just the edges, then you can flip it.

3. After you flip the steak, add the butter, thyme, and garlic. Your pan should be hot enough that the thyme crackles as it hits the pan. Tilt the pan so that the butter infuses with the flavour of the garlic and thyme, and spoon the butter over the steak several times. Repeat for about 2 minutes, then toss in the oven for 5 minutes for medium rare.

4. After cooked, remove the steak from the pan and set aside to rest. Put the pan back on high heat, then add the mushrooms, including the brown mushroom stock resulting from the re-hydration. Reduce to a third, then add the sherry and continue to reduce to a nappe consistency. Remove from heart, add the butter, then strain with a fine mesh.

5. To plate, pour the sauce on a plate, arrange a couple stalks of seared asparagus in parallel, then top with some roasted potatoes. Place the steak on top of the garnish, then top with the blue cheese and serve.

Enjoy!

Sous Vide Lamb Belly with Mint and Pea Puree

This dish epitomizes spring on a plate. This was the intention prior to making lamb belly for the first time; I knew the flavour combinations I wanted to incorporate, I just didn’t know how to execute it. To see the ingredients come together so harmoniously after the creative process of getting there from a relatively vague initial concept, is what makes me really love cooking.

IMG_2864

Sourcing the lamb belly may be a bit difficult at the run of the mill grocery stores, but if you go to any good butcher they will be able to help you out. If you go to an exceptionally good butcher, like Windsor Quality Meats, they will pull out a hanging lamb from the back and cut off the belly in front of your eyes.

IMG_2858

Ingredients:

For the lamb, start the prep 48 hours ahead:

1 side of lamb belly, about 2-3 pounds

4 tbsp kosher salt

2 tbsp sugar

Zest of two lemons

A couple sprigs of fresh rosemary, chopped

1 tbsp olive oil

Game plan for the lamb, start 36-24 hours in advance. 48 hours lines up nicely for timing if you start the cure in the evening.

Directions:

1. Mix the salt, sugar, rosemary, and lemon zest in a bowl. Sprinkle a layer in a baking dish, then set the lamb on top, then cover with the rest of the mixture. Firmly press the curing mixture into the lamb. Cover with plastic wrap and refrigerate for 24 hours.

2. Thoroughly rinse the curing mixture off the lamb, then set on a cutting board and cut it in half into two broad strips. Do not season the lamb with any more salt, it will be perfectly seasoned at this point already.

3. Roll up each strip of lamb belly like a jelly roll, press down to ensure it is packed tightly together, then tie with kitchen twine. You want the rolls to be as tight as possible with no air gaps.

IMG_2862

4. Place each roll of lamb into a ziplock bag. Add a glug of olive oil to each, just to take the space of any small air pockets. Remove the air with the water pressure method, or vacuum seal if you have one.

5. Cook the lamb in a 70 degree water bath for 12 hours.

6. Remove the lamb and transfer to an ice bath the cease cooking. It is now ready for finishing, or you could hold it in the refrigerator until use. To finish, cut off 3/4 inch slices of the lamb belly, and sear in a very hot pan with a bit of oil until some nice colour and texture develops, about 3 minutes. Flip and repeat for the other side, then serve.

For the mint and pea puree:

Ingredients:

1/2 cup freshly shelled peas

3-4 sprigs of fresh mint leaves

Juice of 1 lemon

1 clove of garlic

1 tbsp good olive oil

Pinch of salt and pepper

1/2 cup of water, to bring puree to the desired consistency

Directions:

1. Combine all the ingredients except for the water in a food processor. Pulse until it turns into a fine puree.

2. Slowly add water and continue to puree until the mixture is about the same consistency as cream.

To plate, pour the mint and pea puree onto a white plate to make a pancake size circle. Top with a garnish of fresh spring vegetables. I chose simple parboiled potatoes and carrots, finished with a quick pan sear. As a finishing touch, I sprinkled with fresh peas and fava beans in order to really get the feel of spring on the plate. Top the vegetables of your choosing with the beautiful seared lamb belly and serve right away.

IMG_2863

Enjoy!

Spicy Lemon Roasted Cauliflower

This is a shameless copy attempt at Nuba’s famous “Najib’s”, which are little cauliflower pieces spiced up and fried until crispy, then tossed with salt and lemon.

Fry if you prefer (I think the restaurant does), but I prefer to bake these to the point where charred edges start to form.

Serve it either in a mediterranean style wrap; on a platter with some olives, hummus, and pickled cabbage; or just eat it by itself!

IMG_2767

Ingredients:

1 head of cauliflower

1/2 tbsp ground cumin

1/2 tbsp paprika

1/2 tsp cayenne pepper

2 Tbsp grape seed oil, or equivalent

1 tsp kosher salt

Juice of 1 lemon

Directions:

1. Preheat the oven to 425 degrees C. Place a metal baking pan in the oven to pre-heat. Meanwhile, cut the cauliflower into 1″ pieces, toss in a bowl with the cumin, paprika, cayenne, and olive oil.

2. Remove the pan from the oven after about 5 minutes of pre-heating, and pour the cauliflower bowl into the pan. Make sure the cauliflower is well spaced, otherwise you effectively steam it instead of developing a crispy exterior. Looking from above, you should be able to see the bottom of the pan around each piece of cauliflower.

photo

3. Leave the cauliflower undisturbed for 30 minutes. You will want to bottom edge to develop good caramelization, and a little char, which won’t happen with cauliflower if you keep it moving.

4. After 30 minutes of roasting, now give the cauliflower a toss. You may need to free some pieces with a spatula. Turn the oven to broil on high, and place the pan back into the oven and watch closely for about 5 minutes, or until you are satisfied with the colour. We are just trying to get a little bit of extra char on some of the extremities.

5. Remove from the oven, and toss the cauliflower in a bowl with the salt and lemon juice, and serve.

Enjoy!