Pea and Bacon Risotto for the Nourish Project

Back in the summer I had to opportunity to be part of a very cool project by Gordon Neighbourhood House and the very talented photographer Matt Hanns Schroeter. The project is called Nourish, it’s an intimate community-based photo series showcasing people of Vancouver’s West End community cooking in their own homes. Every week we get to look at another individual from our vibrant Vancouver community cooking a dish that is meaningful to them. I just happen to be this weeks feature!

I prepared a Pea and Bacon Risotto with seared trout while talking with Matt about the dish, cooking, the creative process, and what food means to me. It was a very cool experience, and Matt took some fantastic photos!

12507090_991458807591977_7343623336822453919_n

Check out the Nourish page for a glimpse into my kitchen and to hear some of my ramblings about food!

Nourish Tom

Photo credit Matt Hanns Schroeter


Stuffed Zucchini Flowers with Sauteed Morels

I’ve never made zucchini flowers before, but I came across some particularly handsome specimens at a local farmer’s market and decided to give it a try. They’re not cheap, but they’re pretty cool looking and I’ve been curious about them for a while.

All the recipes I’ve seen tend to stuff the zucchini flowers with a mixture of cheese and things, then tempura batter and fry it. This sounds delicious, but I hate frying at home, so I decided to simply sauté the zucchini flowers for an easier and healthier option. For the stuffing, the possibilities are endless. Just combine any mixture of cheese, garlic, shallots, herbs, etc. and it will be delicious. The peas were a nice touch to give the stuffing a little bit of bite and some nice springtime flavour.

The morels on the side were a nice touch, and I basically included them because we are nearing the end of the season here in the Pacific Northwest. I’ll continue to incorporate my favourite mushroom any chance I get, and this recipe works!

IMG_2932

Ingredients:

6-8 Zucchini flowers

Half a cup of freshly shelled english peas

1/2 cup of fresh feta, I used Salt Spring Island Chili Feta

2 cloves of garlic, minced

A couple sprigs of mint, leaves chopped

Zest of one lemon

One red chili, finely chopped (optional)

Salt and pepper

Handful of morel mushrooms, cleaned of debris

Good knob of butter and a bit of olive oil

Directions: 

1. Combine the peas, lemon zest, half of the garlic, and a pinch of kosher salt in a mortar and pestle. Crush to make a rough paste. You still want some peas to remain more or less intact, but just beat up a little bit. Fold in the feta, mint, and chili to finish the stuffing.

IMG_2918
Feta, pea, and chili stuffing

2. Prepare the zucchini flowers by gently pulling away the petals to reveal what is apparently called the stigma (if you google “flower parts” like I did, it should come up as the first photo result). Cut off the stigma, because apparently it’s bitter.

3. To stuff the zucchini flowers, load up a good dollop on a small spoon. With the  zucchini flower on its side, gently pull away the top two petals and slide the spoon into the cavity. Use your finger to push the feta and pea mixture into the flower, and then close up the flower petals around it. Set aside so that you can get the morels started.

4. Heat a large stainless steel or cast iron pan to high heat, wait for it to get smoking hot, then add the morels to the pan dry. Make sure they are spaced well apart. After five minutes, give the pan a little toss to move the mushrooms around, then add a glug of olive oil, the butter, and remaining garlic. Sauté for another five minutes, keeping the mushrooms moving around a bit. Remove from the pan and season, then set aside.

IMG_2927

5. Add a little more olive oil to the same pan with the morels now removed, and return to medium high heat. Delicately place the stuffed zucchini flowers in the hot pan and arrange so they are well spaced, you may need to work in batches. Cook on one side for 5-6 minutes undisturbed, then remove with a spatula. The stuffing will be barely contained by the zucchini flower at this point, so you’ll need show some finesse here.

IMG_2944

6. To plate, I just haphazardly threw the morels on a plate, arranged the zucchini flowers on top in a parallel or crossed arrangement, then sprinkled some extra chopped mint and cracked pepper.

IMG_2938

Enjoy!


Crostini of Fava Bean and Pea Puree with Sauteed Morel Mushrooms

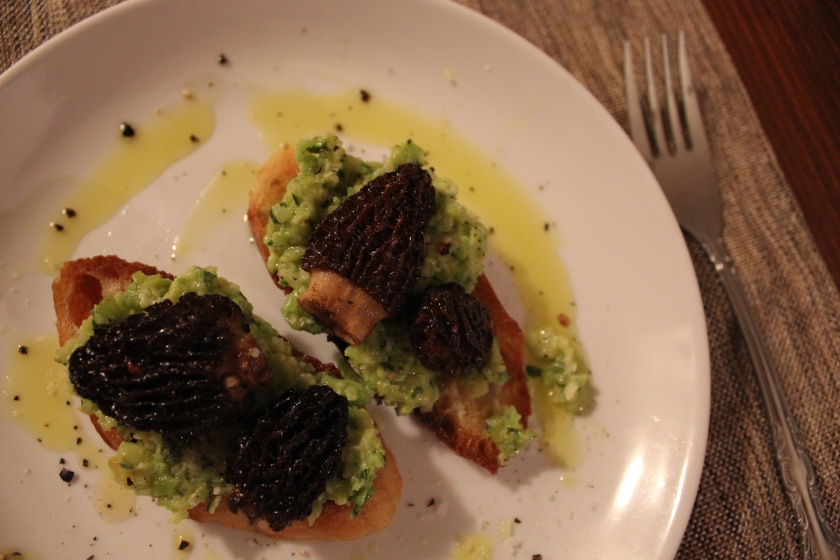
This dish is meant to show off the morel mushroom in all it’s earthy glory. The fava bean and pea puree is exceptional on its own, but forms a fresh, spring inspired bright green canvas for the morel mushroom to unleash its complex umami flavour and unique texture. For me, this dish performs the perfect marriage of the quintessential spring vegetables. It’s food you savour with every bite, and you wonder how a simple combination of things could ever be so mind blowing. If you’re going to make anything from this blog, make this. Serve it as an appetizer, and people will lose their minds!

If you’ve never had the pleasure of eating a fresh morel mushroom before, I implore you to seek some out at a local farmer’s market and make this dish. You will have to go now because the season is extremely short, from mid May to early June in the Pacific Northwest. Fava beans can also be found at the same time, usually at green grocers from May to mid summer.

One day, I will write about a successful mushroom forage, where the bounty is consumed on the spot with a camping stove and a select combination of ingredients. This is the dream, but to date I have been completely unsuccessful in my morel foraging escapades. In the meantime, I will venture further and further into the woods in the pursuit of my namesake. They are elusive little buggers, but I will find them one day!

Fava beans, peas. garlic, morels, and mint

Ingredients:

For the fava bean puree:

1 lb fresh fava beans (aka broad beans) in their shell, about 12 total

1/2 cup shelled peas

2 cloves of garlic, roughly chopped

3 sprigs of mint

Zest and juice of one lemon

1/2 cup shaved Pecorino Romano

1/2 cup high quality olive oil

Salt and pepper to taste

Directions:

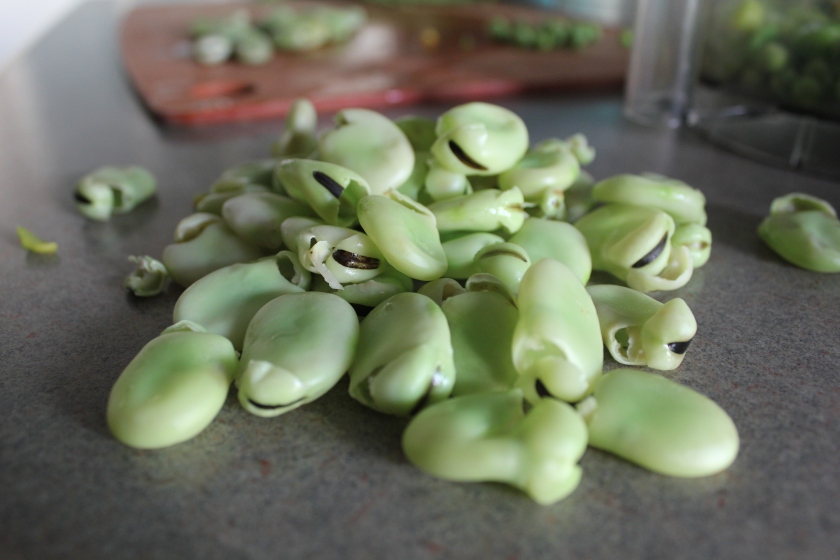
To shell the fava beans is a two part process; it’s intimidating at first, but you’ll be flying through it in no time:

First, take the stem portion of the bean and pull back like you’re peeling a banana. A thin string should peel down the seam of the bean, allowing you to pull apart the sides more easily. Shell as you would a pea, and reserve the beans for part two.

Second, set a small pot of water to boil. Toss the shelled beans in the boiling water for 30 seconds. Remove with a slotted spoon and toss into an ice bath, or rinse with cold water to stop the cooking. To peel the individual beans, hold the fava bean like a guitar pick, with the black line at the end of the bean facing outwards. With your other hand, make an incision right above the black line with your finger nail, and peel down the end. Now squeeze with the fingers holding the bean, and it will pop out into two firm pieces.

Disclaimer: they have a tendency to fly across the room when you are popping them out of the inner shell, but your aim will improve (maybe).

A typical scene when making fava beans

To make the puree:

1. Place all the ingredients with the exception of the olive oil and the Pecorino Romano into a food processor. Pulse on and off, until all the ingredients are roughly chopped.

All of the ingredients prior to blitzing

2. Add the Pecorino Romano, and half of the olive oil, and pulse again a few times to combine. Do not puree to an indistinguishable mush, you want all the character and texture of each layer to come through.

3. Transfer to a bowl, and add the remaining olive oil, stir to combine. The result should look like this:

Proper consistency of the puree

For the sauteed morels:

8-10 fresh black morels, or whatever variety you have access to

1 tbsp olive oil

1 clove of garlic, peeled

1 tbsp butter

Salt and pepper to taste

Directions:

1. Heat a cast iron pan to high heat, add morels to the pan and allow to cook dry for 5 minutes. Don’t overcrowd the pan, you want high dry heat to really bring out the mushroom flavour and aroma.

This is what it means to not overcrowd the pan

2. Add the olive oil, then toss the morels around a bit for about 30 seconds. Add the butter and garlic, and continue to move the morels around. Continue to saute for 2 minutes, then season and remove from heat.

To make the crostini: 

Take a few slices of baguette or french bread, and lightly toast with some olive oil in the morel pan. Rub with a garlic clove sliced in half to finish.

To plate, spread a dollop of the fava bean puree over the crostini, then top with a few of the sauteed morels. Drizzle over some olive oil, and finish with some freshly cracked pepper and sea salt.

Enjoy!

The plated dish, perfection in my opinion!

iPhoto 2

Sous Vide Lamb Belly with Mint and Pea Puree

This dish epitomizes spring on a plate. This was the intention prior to making lamb belly for the first time; I knew the flavour combinations I wanted to incorporate, I just didn’t know how to execute it. To see the ingredients come together so harmoniously after the creative process of getting there from a relatively vague initial concept, is what makes me really love cooking.

IMG_2864

Sourcing the lamb belly may be a bit difficult at the run of the mill grocery stores, but if you go to any good butcher they will be able to help you out. If you go to an exceptionally good butcher, like Windsor Quality Meats, they will pull out a hanging lamb from the back and cut off the belly in front of your eyes.

IMG_2858

Ingredients:

For the lamb, start the prep 48 hours ahead:

1 side of lamb belly, about 2-3 pounds

4 tbsp kosher salt

2 tbsp sugar

Zest of two lemons

A couple sprigs of fresh rosemary, chopped

1 tbsp olive oil

Game plan for the lamb, start 36-24 hours in advance. 48 hours lines up nicely for timing if you start the cure in the evening.

Directions:

1. Mix the salt, sugar, rosemary, and lemon zest in a bowl. Sprinkle a layer in a baking dish, then set the lamb on top, then cover with the rest of the mixture. Firmly press the curing mixture into the lamb. Cover with plastic wrap and refrigerate for 24 hours.

2. Thoroughly rinse the curing mixture off the lamb, then set on a cutting board and cut it in half into two broad strips. Do not season the lamb with any more salt, it will be perfectly seasoned at this point already.

3. Roll up each strip of lamb belly like a jelly roll, press down to ensure it is packed tightly together, then tie with kitchen twine. You want the rolls to be as tight as possible with no air gaps.

IMG_2862

4. Place each roll of lamb into a ziplock bag. Add a glug of olive oil to each, just to take the space of any small air pockets. Remove the air with the water pressure method, or vacuum seal if you have one.

5. Cook the lamb in a 70 degree water bath for 12 hours.

6. Remove the lamb and transfer to an ice bath the cease cooking. It is now ready for finishing, or you could hold it in the refrigerator until use. To finish, cut off 3/4 inch slices of the lamb belly, and sear in a very hot pan with a bit of oil until some nice colour and texture develops, about 3 minutes. Flip and repeat for the other side, then serve.

For the mint and pea puree:

Ingredients:

1/2 cup freshly shelled peas

3-4 sprigs of fresh mint leaves

Juice of 1 lemon

1 clove of garlic

1 tbsp good olive oil

Pinch of salt and pepper

1/2 cup of water, to bring puree to the desired consistency

Directions:

1. Combine all the ingredients except for the water in a food processor. Pulse until it turns into a fine puree.

2. Slowly add water and continue to puree until the mixture is about the same consistency as cream.

To plate, pour the mint and pea puree onto a white plate to make a pancake size circle. Top with a garnish of fresh spring vegetables. I chose simple parboiled potatoes and carrots, finished with a quick pan sear. As a finishing touch, I sprinkled with fresh peas and fava beans in order to really get the feel of spring on the plate. Top the vegetables of your choosing with the beautiful seared lamb belly and serve right away.

IMG_2863

Enjoy!